PxPay 2.0

PxPay 2.0 is a platform independent ecommerce solution provided by Payment Express. Using a Hosted Payment Page to accept sensitive card data, PxPay2.0 provides a financially secure and compliant solution without exposing merchants to sensitive information. Instead of hosting a payment page on their own website, PxPay 2.0 allows merchants to redirect their customer to a payment page hosted by Payment Express; this will normally reduce the scope of Payment Card Industry compliance.

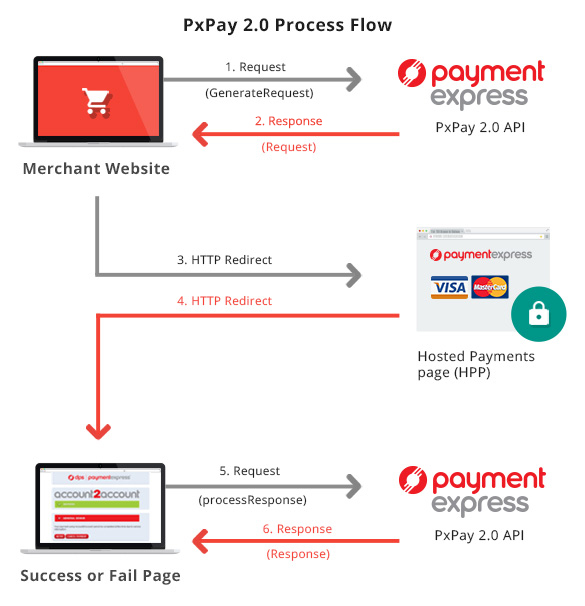
PxPay 2.0 Standalone Process Flow

Downloads

PxPay 2.0 Integration Guide

PxPay 2.0 Style Sheets

PxPay 2.0 Sample Code

The Payment Express Sandbox provides merchants the opportunity to learn about the PxPay2.0 transaction flow.

How it works:

To process a transaction, PX Pay 2.0 allows merchants to send XML requests to Payment Express via HTTPS posts to https://sec.paymentexpress.com/pxaccess/pxpay.aspx.

PxPay Username & PxPay Key is required too.

For testing PxPay 2.0 on the UAT enviornment - please send XML requests to https://uat.paymentexpress.com/pxaccess/pxpay.aspx.

Payment Express responds with a unique URI (encrypted URL) for an SSL secure payments page. Please refer to Request Response Codes in case the URI is not returned.

The merchant shopping cart uses the returned URI to redirect the customer to the secure Payment Express hosted payments page.

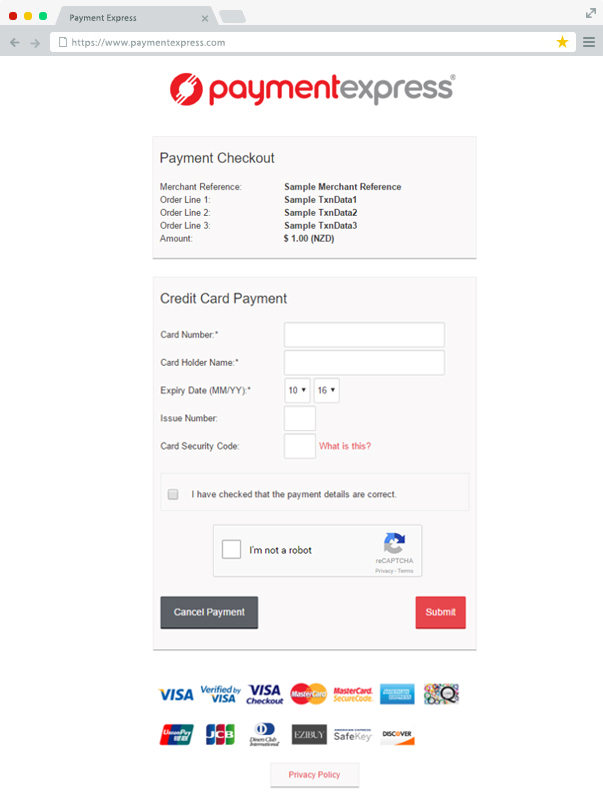
The customer will be prompted to enter their credit card details and complete the transaction. The transaction is then sent to the merchant bank for authorisation. The result is displayed and the user is automatically redirected back to the merchant's website (success or fail page); i.e https://demo.paymentexpress.com/SandboxSuccess.aspx?result=0000120000123476f1519ff80a123456&userid=SampleUserId

You take the "result" parameter value in the URL string i.e. 0000120000123476f1519ff80a123456 along with the PX Pay username and PX Pay key; to send the response request (ProcessResponse) to Payment Express and receive the XML response back.

The transaction results and other transaction details are decrypted and sent back to the merchant as a standard XML response.

PxPay 2.0 Process Flow

Transaction Request:

GenerateRequest XML Document - To initiate a transaction the merchant posts the GenerateRequest to https://sec.paymentexpress.com/pxaccess/pxpay.aspx

Generate Request

A full description of all available elements can be found on the integration guide.

Request XML Document - Once the GenerateRequest has been processed a Request will be returned. The URI returned can then be used to redirect the customer to the Payment Express Hosted Payments Page. Please refer to Request Response Codes in case the URI is not returned.

Generate Request

A full description of all available elements can be found on the integration guide.

Transaction Response:

ProcessResponse XML Document - Once the user has submitted their credit card information and the transaction has been processed, the merchant now needs to obtain the transaction outcome and details.

To extract the transaction details from the encrypted URI string, the merchant sends the encrypted string with their PXPayUsername and PXPaykey in the ProcessResponse (Input XML Document).

Generate Response

A full description of all available elements can be found on the integration guide.

Response XML Document - The Response will return the decrypted transaction results for the merchant to interpret.

Generate Response

A full description of all available elements can be found on the integration guide.

Well Formed XML

Character data sent via PX Pay must be well formed XML. For example, the following is invalid XML:

Payment Express will be unable to read this XML and will return an error. If there is a possibility that a value will contain invalid characters (such as '&' in the cardholder name), please format the value using "HtmlEncoding".

However please make sure the return URL set for success and failure redirection is not encoded as Percent-encoding.

The above example should be formatted as follows:

3D Secure Support

Payment Express have implemented a MPI (Merchant Plug-In) that securely allows an automatic 3D Secure redirection with no development cost or hassle to the merchant whatsoever.

The MPI is compliant with the latest 3D Secure technology. Card schemes estimate that with these new security mechanisms in place, merchants will experience an increase in sales generated, lower operational costs and fewer charge backs due to fraudulent transactions.

Note to support 3DS on the account, please ensure that the merchants contact our Sales and Support team to enable live 3D Secure with the 3DS settings and credentials which are usually supplied by the merchant's bank or acquirer. Usually 3D Secure settlement verification is tested on the live gateway account with the live credit card details.

Fail-proof Result Notification

Fail Proof Result Notification (FPRN) is a server side service that provides additional assurance that the merchant website will receive notification regarding the outcome of transactions completed via the Payment Express Hosted Payment Page (HPP).

FPRN helps cater for the possibility that a user may not successfully navigate to the nominated success or failure URL enabling the merchant web application to acknowledge the outcome of the transaction. The user could close their browser or otherwise navigate away from the Payment Express hosted payment page once they have been informed of the transaction outcome. The merchant's web server may be temporarily unavailable as the transaction is completed and therefore unable to recognise that a transaction has taken place. Using the FPRN service the merchant website is virtually guaranteed to receive notification of the each and every transaction.

FPRN is highly recommended by Payment Express and is enabled on all new accounts by default. The service ensures that the following processes occur for every transaction performed via hosted payment page:

  1. Once the transaction outcome is determined for the HPP session, a background process at Payment Express makes an HTTP GET request to the merchant nominated URL set on the GenerateRequest fields: UrlSuccess, UrlFail or UrlCallback. The URLs should resolve to a HTTP 200, 302 or 303 response externally.
  2. If the merchant nominated URL is unreachable or returns any HTTP status code other than 200 or 404 the notification (HTTP GET) is retried up to a maximum of six times. For example, a 500 HTTP status code, indicating a temporary problem at the client site, will cause a retry.
  3. Our FPRN service will stop sending any notifications immediately on receiving a 404 (Not Found) or 502 (Bad Gateway) HTTP status code.

We can configure the FPRN HTTP status code behaviour further per API user if required. Also per API user we can configure additional query string parameter key value pair for the FPRN GET requests only for the specific API user account. This may help lock a static authentication value for server side notifications. Please contact [email protected] to get assistance with this. Otherwise we recommend to simply set the UrlCallback field per GenerateRequest.

In order to ensure that the web application is in the best position to acknowledge the outcome of each and every transaction certain guidelines should be followed.

The merchant web application should not:

  • Filter or base any conditional logic upon the originating IP address as this can vary.
  • Depend upon receiving one and only one HTTP GET request for the success, fail or callback URL from the Payment Express FPRN system (multiple requests may be sent).
  • The merchant web application should:

    • Rely on the UrlSuccess, UrlFail or UrlCallback field to receive the notification GET message. Note: UrlCallback can be used to receive the server side notification (regardless of transaction outcome) separately to the same GET redirects coming from a client side such as a web browser.
    • Get the 'result' query string parameter value from the GET notification request to UrlSuccess, UrlFail or UrlCallback. Your URL will have that appended 'result' query string parameter containing the encrypted key for the transaction details. The query string also contains the ‘userid’ to identify the API user associated to the transaction outcome.
    • Use the userid as PxPayUserId, include the PxPayKey stored securely in your server side and result parameter as Response value for the final ProcessResponse request to get the final decrypted transaction outcome details.
    • Determine if a database operation or some form of communication such as generating an order record or sending an email is required. Generally this will mean that the application needs to be aware if these actions have been taken previously for the particular transaction or not. TxnId should be used for this purpose.

    Note: The URL at which the merchant website will process FPRN requests must be exposed via standard internet ports i.e. port 80 or port 443 for SSL/TLS traffic. When specifying UrlSuccess, UrlFail or UrlCallback field values do not specify a non-standard port number within the URL.

Mobile Device Integration:

The PxPay 2.0 interface can be integrated on a native mobile application as a payment method.

The mobile application may utilise a webpage component to view the hosted payment page over HTTPs.

The mobile platform being integrated with PxPay 2.0 should support HTTPS posts and XML data exchange.

The PxPay 2.0 payment automatically switches to a mobile format for mobile devices by default.

If the PxPay 2.0 payment page is not responsive to the mobile device's screen as expected,

please ensure the user agent string that the device's web browser is reporting is mobile specific within the first 255 characters of the string.

Custom Hosted Payment Page

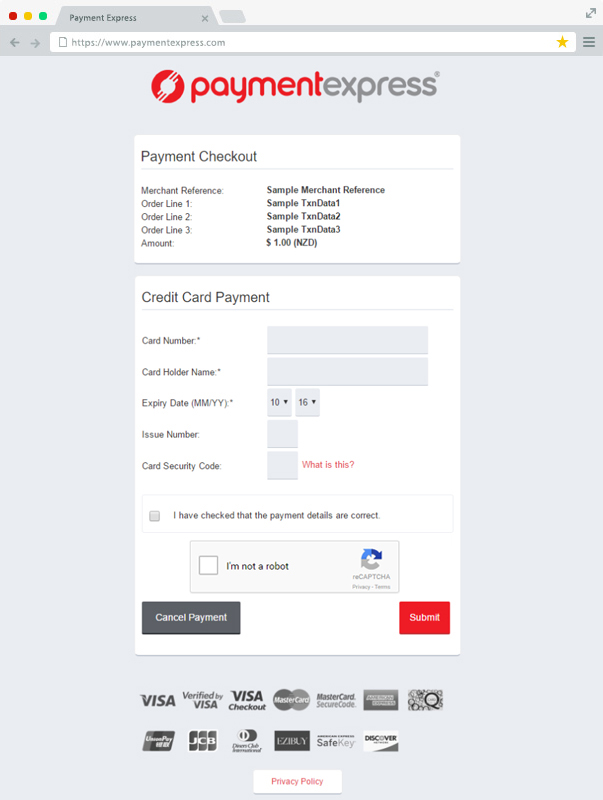
PxPay 2.0 Sample Pages:

PxPay 2.0

PxPay 2.0

Technical Specifications/Features:

  • Ability to customise the look and feel of the hosted payments page.
  • Pre-set style sheets available to customise the look and feel of the hosted payments page.
  • Support for merchant submitted custom header, footer logo, button and background images.
  • Support for merchant submitted custom CSS.
  • Display logos of accepted cards.
  • Display or hide Payment Checkout information such as Amount, Merchant Reference and TxnData1-3 fields.
  • Ability to customise all field labels & titles.
  • Preview option available before deployment.
  • Display or hide Payment Result page.

Requirements:

A PxPay 2.0 development or live account.

"Setup Custom Feature" on your Payline logon* at https://sec.paymentexpress.com/pxmi3/logon

*Please note PXMI3 is our modern Payline portal mainly for the PxPay 2.0 interface customisations. For other services we recommend using the normal Payline logon via PXMI at https://sec.paymentexpress.com/pxmi3/logon

Please contact [email protected] if you do not have a Payline account and/or the Setup Custom Feature option available on your Payline portal.

For more information, please go through the section "HPP CUSTOMISATION" in the Payment Express PxPay 2.0 Integration Documentation (PDF): Click here to download

Once you update the customisation settings to your hosted payment page, please review them using the Preview option on the Payment Manager portal.

In order to:

Upload a merchant logo or background images:

Please email your images to [email protected] quoting your PXPay ID in the email. Please send image files in web format only (.jpg, .jpeg, .gif, .png).

Important: Please make sure each image you send to Payment Express is lower than 50 KB in file size. You may need to resize the image if it is higher than 50 KB in file size. The Payline system will truncate an image file which is any larger than 50KB in size.

Submit a customised CSS file:

A sample of PxPay 2.0 CSS file can be downloaded here

Please email your CSS file to [email protected] quoting your PXPay ID in the email. Please ensure the CSS file ONLY contains CSS code. No HTML and Java Script is allowed in the file.

Apply your customisations live:

To apply or publish the customisations for your hosted payment page, please email [email protected] quoting your PXPay ID in the email.


A2A


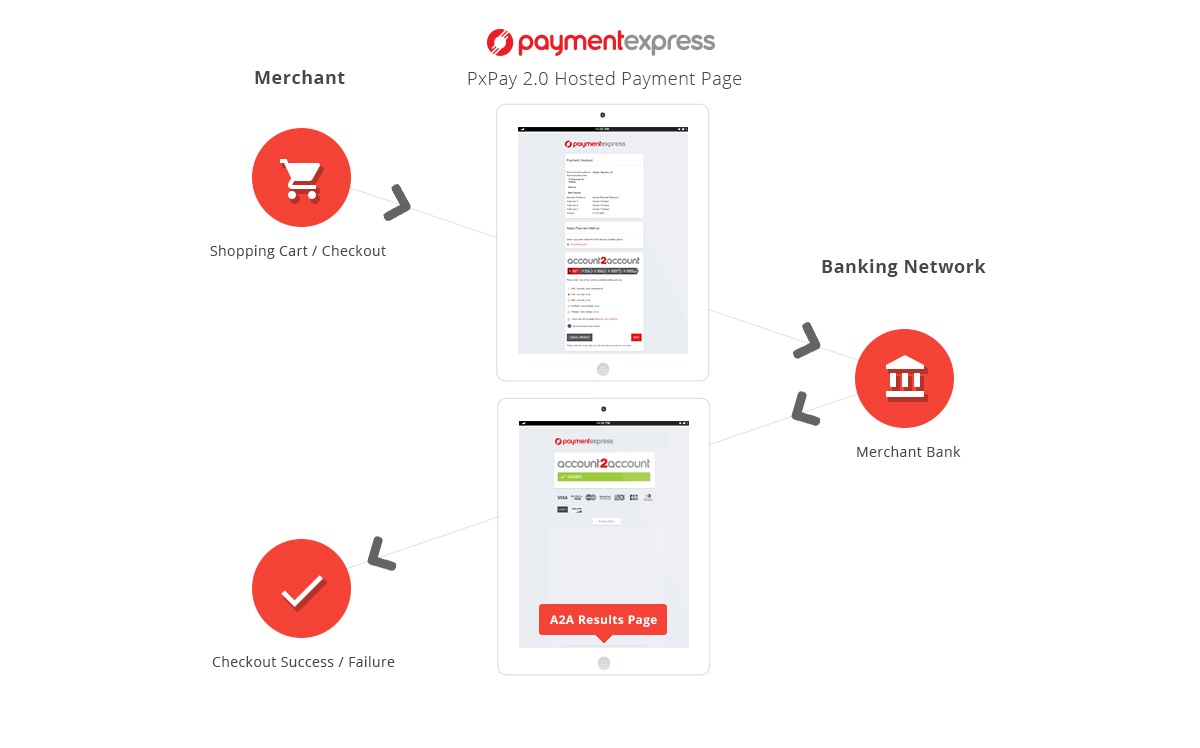
Account2Account (A2A) provides a solution for merchants to accept payments directly into their bank account by creating a one-off online payment using the customer's online banking portal. This sort of facility is already widely used where a merchant provides their bank account details and customers pay by creating a one-off payment via their online banking portal.

The key difference is that with A2A, the one-off payment is created on a secure page hosted by Payment Express. Payment Express can authoritatively inform the merchant when a payment is created and the customer is redirected back to the merchant's website once payment is created. This means that the merchant website receives the transaction outcome in real-time. Goods can then be shipped on the receipt of funds to the merchant's bank account (or at the merchant's discretion).

Supported Banks

Test Accounts

Live bank accounts are required for testing. If you wish to test A2A please send request to [email protected].

Payment Expres Support will require a live merchant bank account number (e.g. 01-1234-5678910-00). This is the bank account number that the funds will be transferred into.

Note that you will only be able to receive payments in your bank accounts local currency, i.e. A BNZ merchant account (even a multi-currency account) will only be able to process A2A payments using NZD.

Merchant can setup A2A with multiple bank account details each with different local currencies to have the ability to accept a wider range of currencies, and A2A will automatically select the correct account based on the transactions currency (As specified in the GenerateRequest message).

Account and currency mismatches will simply result in GenerateRequest failure.

Statement fields and reconciliation

For Account2Account statement reconciliation process please note the following:

Particulars field contains 6 digits rolling number (STAN) appended with the string "DPSA2A". The STAN also appears in your payline transaction records.

Code field contains the first 12 characters of your merchant statement name.

Reference field contains the first 12 characters of Merchant Reference.

Please note certain banks do not allow entering special characters such as _, &, ?, @ in the reference field. Hence we strongly suggest to avoid adding these characters in the merchant reference field. The alphanumeric and space characters will be accepted by all banks. Any other characters may be omitted by Account2Account for certain banks.

The following is an example of the Merchant Bank's Particular, Code and Reference fields:

Merchant Reference: "Order1234567"

Merchant statement name: "TheShop"

Your fields will be for example:

Particulars: "000001DPSA2A"

Code: "TheShop"

Reference: "Order1234567"

Please note the above is only applicable for transactions in NZD via New Zealand banks.

PxPay 2.0 Comparison

- Set TxnType to 'Purchase' only.

- Set CurrencyInput to 'NZD' or 'AUD' depending on the account setup.

A2A does not support tokenisation.

Response Codes

Code Description
RC User Cancelled (customer may have explicitly cancelled the transaction from the Account2Account hosted payment page).
51 Possibly Insufficient Funds in the customer’s (payer’s) bank account (or the payment failed due to a bank account issue).
U9 Uplink Timeout. NOTE: Possible payment may have occurred if the customer attempted to submit at the payment confirmation stage. Please contact the Support team.
NY Uplink Connection Error or Uplink may be offline. NOTE: Possible payment may have occurred if the customer attempted to submit at the payment confirmation stage.
EN User Timeout (payer may have abandoned during bank account logon or the bank account selection stage) NOTE: However no payment has occurred
G3 User Cancellation during authentication of account.
GN Timeout of the payment.